Thursday, February 21, 2013

Bell Peppers! A quick "how to".


Tamara Nugteren


I love bell peppers.
But I didn't always.  Not until college, actually.  This gives me hope because my children won't go near them (they sometimes even recoil in fear).  Maybe someday they'll share my love for those beautiful sweet peppers.

In the meantime, it's just the adults.  Oh well, more for me.

I'm sure you know from the vibrant colors, that bell peppers are pretty nutritious.
Here is a quick synopsis, borrowed from the Whole Foods website, to convince you to add more to your diet.

"Bell pepper is not only an excellent source of carotenoids, but also a source of over 30 different members of the carotenoid nutrient family. A recent study from Spain took a close look vitamin C, vitamin E, and six of these carotenoids (alpha-carotene, beta-carotene, lycopene, lutein, cryptoxanthin and zeaxanthin) in all commonly eaten foods and found that only two vegetables contained at least two-thirds of all the listed nutrients. One of these foods was tomato, and the other was sweet bell pepper! Bell pepper alone provided 12% of the total zeaxanthin found in the participants' diets. (Bell pepper also provided 7% of the participants' total vitamin C intake.)"

This wonderful chart is also from the Whole Foods website: 


Nutrients in
Bell Peppers
1.00 cup raw (92.00 grams)
Nutrient%Daily Value

vitamin C195.8%

vitamin A57.6%

vitamin B613.5%

folate10.5%

fiber7.4%

vitamin E7.2%

molybdenum6.1%

vitamin K5.6%

potassium5.5%

manganese5%

vitamin B24.7%

vitamin B34.5%

vitamin B13.3%

tryptophan3.1%

vitamin B52.8%

magnesium2.7%

Calories (28)1%


Source: 
http://whfoods.com/genpage.php?tname=foodspice&dbid=50


Why am I telling you all of this?  Because there was a BIG SALE on bell peppers at one of our local grocery stores yesterday and I bought fifteen peppers.  That is WAY too many to reasonably eat before they go bad, so I thought I'd take this opportunity to give some insight in how to handle an excess of this great vegetable.  Useful information in the summer as well when you may have a garden bounty on your hands.

Note:  I normally grow these peppers in the summer, but my stash has been long gone.  When possible, I buy them organic, but up here in the frozen tundra - they are expensive.  The sale peppers I bought weren't organic, but in my book, the health benefits outweigh any risk.  The sale was just too good! 
(Cub has them for $1 each right now. Even the red, orange and yellow ones!)


Roasting and Freezing

Roasting 

Roasted bell peppers are a versatile ingredient in many recipes, as a pizza topping or even just on a sandwich.

You can buy roasted bell peppers (jarred in oil), but they are expensive.  But, if you have a bunch on hand, its really easy to do on your own.

Step one: Place your peppers on a baking stone, cookie sheet or sheet of foil. This is important because the peppers will leave a sticky residue behind.  It is not necessary to wash them, as the skin will be removed.  Heat under your oven's broiler for around 5 minutes or until the skin begins to blacken.  Using tongs, turn all the peppers and repeat.  Continue until all sides have become mostly blackened.

Step two:  Remove peppers and place them inside a paper bag.  Fold over the top and clip it shut. Wait.

Step three:  This third step is messy, so have paper towels, a trash bowl and a clean work surface available.  Once the peppers have cooled (30 minutes, give or take), remove them from the bag.  Peel the loose skins off and discard.

Step four: Using a sharp knife and cutting board (duh) slice open the pepper and remove the stem and seeds.  The pepper is likely filled with moisture, so you may need to dump it out to prevent a bigger mess.  Slice the pepper into 3-5 equal pieces.  Pat them dry with a paper towel.

Step five: Decision time!
- If you can eat these in the next couple of weeks, place them inside a clean jar and top off with a good olive oil.  Refrigerate.  The flavor should stay strong and delicious.

- If you want to keep the peppers for a longer period of time, you will want to IQF the peppers.  Individually Quick Freeze.  Line a cookie sheet with wax or parchment paper (for easy removal).  Place the pepper pieces on the tray - fill it up, just don't let them overlap.  Freeze.  After they have fully frozen, remove the slices and put them in a freezer bag.  Don't forget to remove as much air as you can. Freeze.  Now you can pull out just a few whenever you need them.  This method is particularly great for recipes where the peppers will be baked or sautéed.

Fresh Freezing

Step one: Wash the peppers thoroughly.  

Step two: Slice like a pro.  
- Using a sharp knife and cutting board (again, duh), slice around the step to remove it.  Think pumpkin carving.  Pop the stem out and remove most of the seeds at the same time.  
- Give the inside a quick rinse to pull out a few more of the remaining seeds.  
- Slice the pepper in half and with your fingers, remove any of the remaining white pith. 
- Turn one of the halves on it's back - inside up.  Slice top to bottom into even sticks (Aim for about 1/4 to 1/2" wide).  Repeat with the other half.  
- You can stop here, or continue on to diced peppers.  Just depends on what you want to use them for.  Diced for recipes? Sliced for fajitas?  I do some of both.

Step three: Follow the directions above for Individually Quick Freezing. 


Enjoy! Delicious, super nutritious bell peppers at your finger tips!

I'll post some of my favorite bell pepper recipes soon. 

Thursday, February 14, 2013

Easier, healthier, quicker baking from scratch.

Tamara Nugteren


I love to bake.
Muffins, breads, cookies - basically anything that goes into the oven.

When you bake from scratch, you control the ingredients that go into your families
and yourselves.
No dyes or artificial anything.  No things you cannot pronounce.  You can tweak the recipe to your family's tastes or dietary needs.
Basically, love and care - straight from you.  (Not that anyone appreciates it, right?)
I always try to get a really great result with less sugar and fat and more of the healthy ingredients - whatever the recipe.  You'll find me adding flax or chia seeds and using whole wheat pastry flour* in my muffins.  I add extra vegetables to my meatloaf and I often cut out the dairy in recipes when I can (for my daughter).

But scratch baking takes time.  Worth it of course, because it is SO much better tasting - but still, you need the time.

Simple tip of the day:
Whenever you find time to bake something - make extra.  You have all the ingredients out anyway, and that is half the battle.

Ready to go Popover Mix

For muffins, breads, cakes, etc. - put all the dry ingredients into a baggie.  Label it well, with the needed remaining wet ingredients and the baking instructions.  Just like Betty Crocker.  Store away for later.


For cookies, go ahead and make up the extra dough.  Place all your extra dough cookies onto a baking sheet and freeze solid.  Then just pop the frozen, unbaked cookies off the pan and into a freezer bag.  Mark the outside of the bag with the oven temperature and baking time.  Bake at your leisure.  Do a whole batch of cookies or just two next time you are ready.  (A great time saver for when you suddenly have extra children at your house who all want a snack).


Oatmeal chocolate chip macadamia nut cookie dough.

For savory, entree-type items, make up a complete extra dish and freeze in the container that you will later bake it in.  For example, I freeze unbaked "mini meatloaves" in the muffin pan.  Once they are solid, I pop them out and into a baggie.  Later, when I need them, I can put the frozen mini meatloaves back into the muffin pan and bake them.  For homemade meatballs, do as you would the cookie dough. You can also use the aluminum recyclable pans that they sell in the grocery store for items like lasagnas or other types of one dish meals. Use your imagination.  I try not to use any of my good glassware or bakeware for freezing because I need it too often.

Frozen, unbaked mini meatloaves
(Make sure to get the air out of the bag,
though - this picture doesn't show that)

I'll post some recipes to get you started separately - so please check back.  My dog needs a walk.


* Whole wheat pastry flour (WWPF) is whole wheat flour that has been ground extra fine.  I use this in a half/half mix with regular unbleached All Purpose (AP) flour for most things.  Muffins, cakes, cookies.  Extra health benefits from the whole wheat flour, but light enough to bake well.  The extra fine grind makes it unnoticeable to those with picky pallets.  The half AP flour assures that the end product will not be too heavy.  Unfortunately, I haven't had good luck using WWPF for breads.  I think I could make it work with the right amount of added gluten, but I haven't given it a good try yet.  I'm still using Bread Flour for bread. If you haven't yet tried the whole wheat pastry flour - try it.  It is sold in many places, but not everywhere.  For example, SuperTarget only has it sometimes.  Cub has it in the organic section (even though it isn't organic).  Bob's Red Mill sells it, among others. 


Tuesday, February 12, 2013

Scarves, hats and shoes

Tamara Nugteren


Not just for shoes -
The humble, collapsable, hanging shoe organizer.  Available just about anywhere.

We actually don't use ours for shoes at all.
I use mine to hold and keep my scarves and wraps.  My daughter uses hers for hats, purses and - at the moment - flashlights.
My scarves and wraps - easy to find,
with room for more!
Lily's hats, wraps, purses
& flashlights.


It's really a versatile organizational tool in your bedroom closet.  You may even already own one.  Are you making the most of it?

Monday, February 11, 2013

A happy home for little girl's earrings


There are many, many things that could be easier in life, if only there was the time to "do something about it".  I mean really.  Just look around where you are right now.  You probably see dozens of things that could be better "if only". Right?  But we must pick our battles.

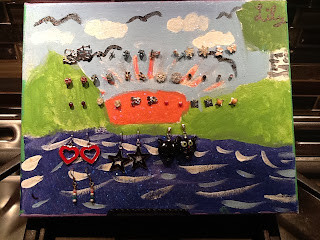
This project certainly isn't anyone's biggest area of concern - but it was very fun and looks great.  It was born of a "clean your room" assignment that went off course.  That said, this project ended up being a great three-for-one deal for both of us.  It was a craft (which she loves), it was time spent with Mom (important) and it solved the dilemma of what to do with all those little earrings.

The inspiration for this fix was actually my 9 year old's original idea.  She was keeping her earrings on a sheet of paper, hung on her closet door.  So organized, right?  I like to think the apple doesn't fall far from the tree, but you should see the rest of her room! Ugh! But I digress and support the positive here.
Her original earring holder.  Cute, huh?
She even used the label maker at the top...

I liked her idea but knew it needed improvement (it was paper, after all).

Here is the project:

Step one - purchase an unpainted canvas from craft supply store (we went to Michaels)*.  Anything smaller than an 8x10 will be too small.  There are many choices in the painters area - the most inexpensive one will do.

Step two - allow your daughter to draw (with pencil) a picture on the canvas.

Step three - the fun part! Let your daughter paint it.  You'll want her to use acrylic craft paint.  It is inexpensive and comes in a million colors including metallics and glitter. Buy several - keep them for other projects.   Don't forget to paint the sides of the canvas!  It won't be going in a frame and you want it to look nice on the edges!

"Sunset" - a Lily original. 
Step four - the adult job.  Flip the DRY painting over.  Using a pencil or marker, make evenly spaced dots in rows all over the back of the frame.  You'll want them spaced about 1- 1 1/2 centimeters apart.  You can "eyeball" this.  Perfection is over rated.

Use all the available space.  Then it will be ready to
go as your daughter collects more earrings as she grows.

Step five - again, for the adult.  Take a hand sewing needle (the biggest one you have) and pop a hole through the canvas at each mark.  It should pop through pretty easily. If it doesn't, try another needle -  yours may be dull.

Finished! The first time you put earrings through, you may notice that they require a little effort to push through.  I'm sure the earring posts are a little thicker than your needle.  The earrings will stretch out the hole and it will be easier next time.

For ease of use, you'll want a small easel to hold your earring masterpiece**.  These are sold many places, including office supply stores.  They are inexpensive - I actually already had one on hand.

When finished, you will have a customized piece of functional art and your daughter will think you are SO FUN and pretty smart, too!

The finished product.
There are many more available holes than
she is using right now - room to add on!


Notes
* If you find yourself at Michaels Crafts regularly, then you probably already know that they ALWAYS have a 40% off coupon available - usually in the mail or the Sunday newspaper.  If you are like me, you normally forget it at home or it has expired.  Michaels Crafts has an App for your smartphone that has the current coupon on it - scanable at the register.  Yes, there is an app for everything now - but this one is one I'll use and save good money with.  
** These inexpensive easels are also great for holding an iPad.  You don't need something expensive! I use one in the kitchen with mine.